Author Archives: Jonny Kaldor

About Jonny Kaldor

three kids, two days, one dad. no reason to eat rubbish.

Noodles

IMG_0182 3

I came back from the Bang Bang Asian supermarket in Colindale two nights ago laden with all sorts of goodies, but I missed the most vital ingredient – noodles. I have this habit of buying bags and bags of them – Udon, Soba, Ramen Lo Mein and they then get stuffed into a cupboard and forgotten about. So this time I held back from buying any – I walked past aisle upon aisle of them, secretly wanting to buy them all but forcing myself not to, given the stash that was awaiting me when I got home. And so when Immie asked for Ramen yesterday, I was ecstatic – the perfect opportunity to use the fancy king oyster mushrooms and chinese chives I’d bought just two nights ago while also using up a decent chunk of my noodle cache. Of course when I looked, I had no Ramen, no Soba, no Udon – in fact all I had was a small bag of super fine rice vermicelli – so this recipe is pretty much ramen without the ramen. Actually it’s probably closer to Pho. In reality, it’s neither, but It’s really good and ridiculously simple so I’m going to write it down anyway…

Noodles
Take a lemongrass stalk, peel off the outer layer and split it down the middle (you’re going to fish this out at the end), then slice a thumb of ginger, a red chilli, four cloves of garlic, the stalks of a handful of coriander leaves, a couple of large king oyster mushrooms (or lots of normal ones, or pretty much any white/pale mushrooms you fancy), julienne a carrot and stick everything in a large saucepan with a couple of litres of stock (chicken preferably), a few splashes of rice vinegar and fish sauce, a little salt and pepper (maybe even Szechuan peppercorns if you like) and bring it all to the boil. In the meantime, in a separate pan stick your preferred noodles in boiling water and heat them for a few minutes (check the pack for how long as they all differ).

When the noodles are ready, portion them into bowls and cover them in your broth along with a good squirt of lime juice and a handful of chopped coriander leaves. Add soy sauce to taste.

It’s hot, sour, savoury and spicy – perfect for a chilly winter’s day…

Sourdough – I think I finally have it…

We’re deep in the grip of the Coronavirus and people of the world are buckling down for the months of isolation ahead. We’re extremely lucky and grateful to be able to pretty much keep things going as normal at Pugpig, and I’m doubly lucky because for the first time ever I get to bake sourdough more than once a week. The problem, you see, is that while sourdough isn’t particularly labour intensive, it does need little doses of regular attention over the course of two days making it impossible to do unless you’re around the house for a suitably extended period. And right now I am, which means I’m finally getting to grips with the stuff. If you see any other bread posts on here (published prior to this one) please ignore them – I had no idea how to make bread until a few months ago when my big sis Nic finally showed me how it’s done. God knows how I got away with the method I’ve been using for the last few years, but it certainly explains why my loaves used to be as dense as black holes…

Simple white sourdough

I don’t usually give exact measures in my recipes but you really do need some idea of quantities for this, so I’m going to break my habit just this once.

First you need a starter – you can either make it yourself (google it) or buy it from a baker or even on Amazon (or ask me and I can probably give you some of mine). You then need to keep the starter alive, which is pretty easy: either stick it in the fridge where it will happily lie dormant for quite some time, or every day add 100g of strong white flour and 100ml of water to the starter and mix it together. If the starter beings to grow beyond the confines of your jar, take the excess and stick it in another jar – you can use it for pizza dough, pancakes, all sorts of things.

Now, two nights before you want to bake your loaf, make sure you give your starter a feed and leave it out in the warmth of your kitchen. The next morning when you wake up take about150g of your starter and add it to 450g of strong white flour, 280ml water and 12g of malden sea salt.  At this point you can add whatever else you like – I often throw in a couple of tablespoons of caraway seeds. You could also try a few handfuls of olives and jalapeños. Or raisins and walnuts. It’s also amazing if you add absolutely nothing. Either way, adulterated or not, mix everything together until it makes a fairly smooth and slightly sticky dough. It does not need to be perfect at this point, Stick it in a large tupperware container, slap on the lid on and leave it for an hour. After an hour take it out then stretch it, fold it, stretch it, fold it, stretch it and fold it a few times. Put it back in the container and an hour later do the same thing. and again. and again and again. After a 4-5 hours, the dough should be very stretchy and springy. If you poke it with your finger the indentation should spring back fairly quickly. It should feel really good to the touch. Maybe even a little too good if you get my drift. And this is the great thing about sourdough – there’s no kneading required, just this gentle folding and shaping, which you’ll enjoy far more than you might expect.

Now let the dough continue to prove for a few more hours and round about early evening stick it in a well-floured proving basket and cover it with something relatively airtight. Leave it there until you go to bed at which point pop it in the fridge overnight, still covered.

When you wake up in the morning, turn the oven to full power and place a small saucepan full of water in the bottom. Take your loaf out of the fridge, turn it out onto a floured baking tray and score the top of the loaf to allow it to rise freely (if you don’t do this it will burst somewhere you least expect it). When the oven has reached full temperature, stick the bread in (being careful not to get a face full of steam as you open the oven door). After about five minutes turn the temperature down to about 200c and bake for a further 35-40 minutes. When it’s done, the bread will sound hollow when you tap its bottom.

Take it out and leave it to cool down on a rack, wait as long as you can bear and then cut a slice, cover it with butter and slip into a rare state of perfect pleasure.

I guarantee that once you go sourdough, you’ll never want to bake regular bread again.


Triple truffles (with a bonus breakfast track)

img_4227-1.jpeg

As has become standard procedure for the Kaldor/Dunning Christmas, truffles took centre stage for dinner on Christmas Eve and breakfast the following morning. Thanks to Nigel and his wonderful truffle site (www.trufflehunter.co.uk) we went large this year with a mix of fresh white winter truffles, truffle butter and minced truffle. Truffle overdrive. And while it feels like we’ve all been heavily bombarded by truffle dishes over the last 5 years they’re still a real treat if you don’t overdo them. Or if you only overdo them one day a year. Maybe two.

Truffles thee ways

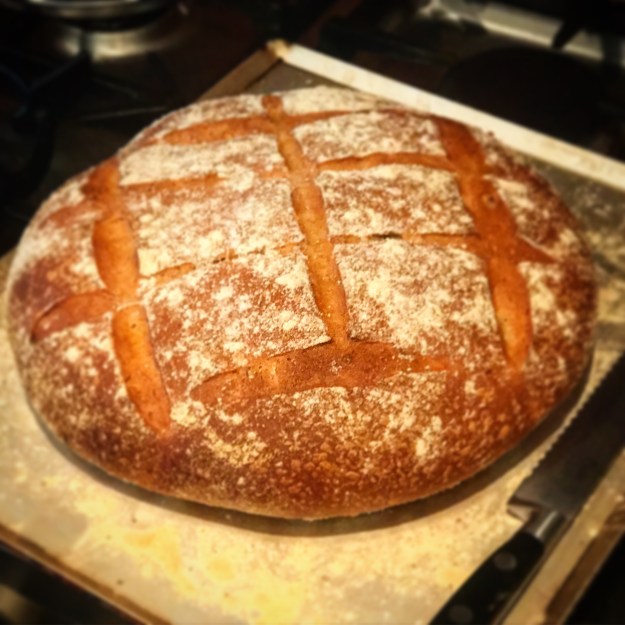
We started with baked camembert with truffles and sourdough bread (the recipe for which will follow soon, kindly passed onto me by my big sis Nic). It really can’t be simpler – take a camembert, remove the paper and pop it back into the box, score the top of the cheese and pop in slices of your fresh truffle. Stick it in the oven at 180c for 30 minutes. Take it out and stick your bread in it.

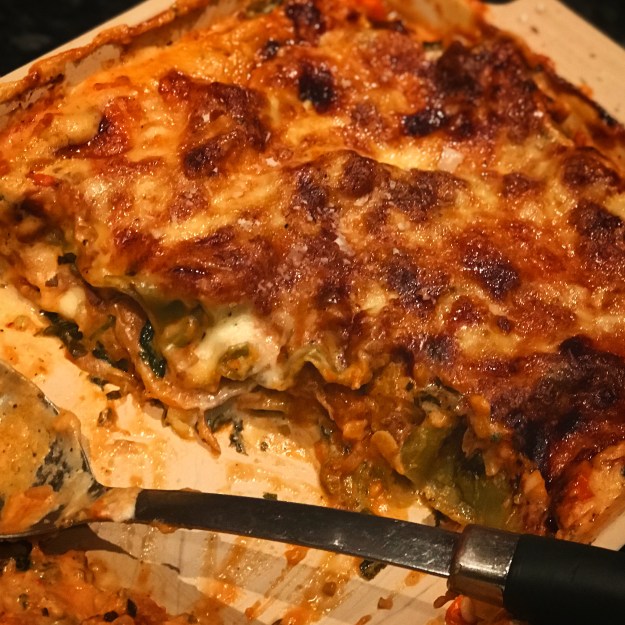
That was quickly followed by wild mushroom and truffle ravioli with a truffle butter and cream sauce. It takes a little more effort this one, but definitely worth it.
Start by making your pasta dough – mix 200g of pasta flour with 6 egg yolks, a pinch of salt and a tablespoon of cold water. It will be pretty tough, but don’t over work it – just bring it together into a smooth dough, wrap it in clingfilm and stick it in the fridge for an hour. Now you can make the filling – finely chop a shallot and a few handfuls of wild mushrooms, preferably chanterelles or morels. If you can’t find fancy mushrooms chestnuts mushrooms will do just fine. Fry them gently in butter, add some fresh thyme and season well. Once they’re cooked through, add a large knob of truffle butter and two teaspoons of minced truffle. Set the mix aside to cool.
Now you make the ravioli. Either with a pasta maker or a rolling pin, roll the pasta into thin sheets – as thin as you can get without any holes forming – probably about 1mm. Use semolina flour to keep them from sticking to your work surface. Take two round pastry cutters, one slightly larger than the other, and cut as many circles as you can with the dough you have made – equal amounts of each size. With the quantity I used above, you should get about 32 circles (making 16 ravioli)

Now lay out the smaller circles and stick a heaped teaspoon of the mixture in the centre of each one. Take a pastry brush and some water and brush around the edge of each circle and then place the larger circles on top, carefully ensuring there are no air pockets in the ravioli and sealing them around the edges. Dust them with semolina flour so that they don’t stick together and put them aside ready for when you want to cook them. They can sit like this for at least a day so you can do all this work in advance. At this point they should look a little like the ones in my photo above.

For the sauce, take a frying pan and melt a large block of butter with more of the minced truffle and thyme leaves, carefully add a little single cream and season well. In the meantime bring a large saucepan of salted water to the boil and drop in the ravioli. They’ll only need a few minutes to cook. Once the butter sauce has cooled a little, squeeze in the juice of half a lemon.

Now put three of the ravioli onto each plate, spoon over the sauce and shave fresh truffle on top. Perfect.

Since there’s a ton of  butter and cream in the dish, you’ll need something a little sharp to accompany it and this goes really well – mixed leaf salad with truffle vinaigrette.  The vinaigrette is really simple – finely chop garlic, dijon mustard, olive oil and white wine vinegar, salt and pepper and three teaspoons of minced truffle. I used chicory leaves (which are perfectly bitter for this), watercress and rocket. And that’s it – the perfect meal for Christmas eve.


The next day…

Ok maybe this is overdoing it, but what the heck, it’s only once a year. When you get your fresh truffles, put them in a tupperware box with half a dozen eggs – they’ll slowly take on the truffle aroma as the shells are porous. On Christmas morning, take the eggs, whisk them up, season them, stick a large block of truffle butter into a frying pan and then add the eggs. Move them around the pan gently until they start to solidify. Once you see this happening get ready to pull them off the heat – you have to have these eggs french style – nice and runny – or you’ll be missing out. As soon as they look good, take them out of the pan, shave the last bits of your fresh truffles all over them along with a handful of chopped chives. Serve with toasted sourdough.

img_4263.jpeg


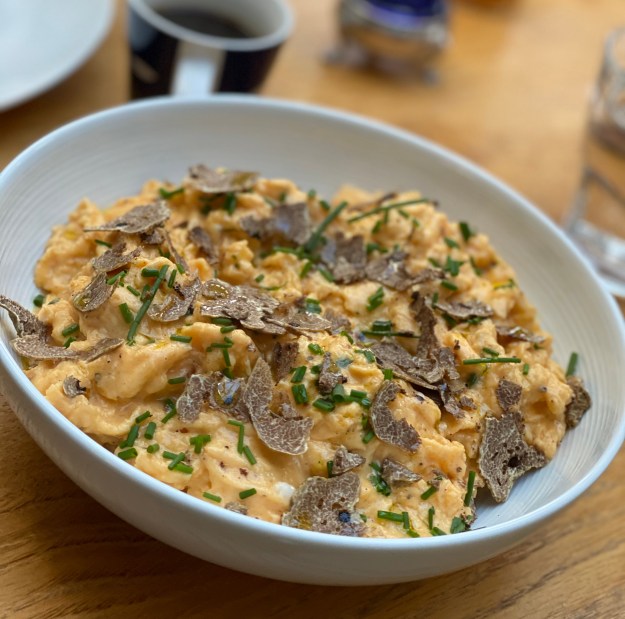
And here’s what this year’s little beauties looked like…

IMG_4215

Happy Christmas everyone!

Chicken Biryani

78989F87-1DAB-4400-97B0-710F70FAF7E9.jpeg

Another six months, another post. Christmas is drawing near yet again and I find myself with an hour to kill despite the fact that I still have 70% of my Christmas shopping to do. Saying that, it’s far too late to do anything about it now – they’ll just have to make do with a jar of homemade chutney or something.

And speaking of chutney – how about this? I cooked it for the shorts a few weeks ago and it instantly became my favourite curry dish…

Chicken Biryani (with wild and basmati rice), Dhal and Yoghurt 

Start by boiling the wild rice in salted water for about 15 minutes (it takes much longer than white rice to cook) and then wash it and set it aside.

In the meantime, take your biggest casserole dish and fry a couple of onions, at least 10 cloves of garlic and two thumbs of ginger, all finely chopped (actually, one of the onions I like to chop into slices so that you can see them in the dish). Throw in a few red and green chillies – as many as you can handle (you have to decide this one for yourself) and fry for a few minutes. Next add four roughly sliced chicken breasts and fry them in the same pan until brown but not fully cooked. Now add the spices. I would use at least the following: 5 cardamom pods, a tablespoon of each of coriander seeds, fennel seeds, cumin seeds, black peppercorns, sea salt and star anise. Grind them, heat them in a dry frying pan until they almost start to smoke in the heat and then throw into the casserole along with a whole cinnamon stick and a bay leaf.

Then add the wild rice along with the same amount of basmati rice along with boiling water (twice as much water as rice), two handfuls of raisins/sultanas and a chicken stock pot thingy. Let the whole lot come back to the boil and simmer for about 5 minutes.

Now take the casserole off the heat and leave it with the lid on for another 10 minutes. When you open the lid, the rice will have cooked and you’ll be left with a beautiful biryani. Throw a big bunch of chopped coriander (that’s cilantro to my US friends), give it a stir and you’re done.

Serve with Dhal (I’m pretty sure I’ve already covered that somewhere on this blog) and yoghurt (and rotis heated in a frying pan if you have them).

Apologies if you actually know how to make biryani – this is certainly wrong in many ways, but it tastes pretty good to me


Tart

Ok – I know I’ve been neglecting you, and I know that if I were taking this seriously I’d be posting every week, but I’ve been busy. I’m not quite sure doing what, but I’ve been busy nevertheless. Today however the sun is shining, the boys are smiling, Tortoise is launching, New York is buzzing, the team are happy and The New Yorker is nearing, so I thought now might be a good time to throw a new recipe on the pile. So here goes:

Apple Tart

The most exciting thing about his tart is the base – I used pretty much a standard shortcrust pastry (200g plain flour, 100g cold butter, one egg, a splash of water, a dash of lemon juice, and tablespoon of sugar and a pinch of sea salt) but I substituted a handful of flour for a handful of crushed brand flakes. Genius. It makes the crunchiest base you can imagine.

While blind baking the base, I made the filling – a thrown together version of a frangipane with 100g of butter creamed into 100g caster sugar and then beaten together with two eggs and finally folded into 100g of ground almonds. Drop the frangipane into the now cool pastry base and layer sliced apple over the top, hopefully in a much neater pattern than I managed. I’d go for two layers, which will require about three apples. Don’t bother peeling them.

Now sprinkle dark brown sugar over the tart and stick it in the oven at 180c for 30 minutes. Take it out. Let it cool. Eat it. Preferably with a glass of Sauternes.


Goulash and Csipetke

I’ve been wanting to do this for some time – ever since Balazs cooked it for us in a pot hanging over a fire in his Budapest garden. If you’ve never heard of csipetke, they are the little dumplings that you serve with the goulash and they’re exactly like the spaetzle that you find in the south of Germany (although I’m not sure that’s going to help you a great deal). If you don’t have the will to try making them (and shame on you if you don’t) you can always use a small pasta instead.

Goulash and Csipetke

On a high heat, fry 500g of good fatty stewing beef in a pan with a load of oil until nicely browned and move to a large casserole dish. Next fry a few roughly chopped onions and a load of garlic. Deglaze the pan with red wine and throw everything into the casserole followed by a couple of red chillies, bay leaves, a tin of tomatoes (controversial), a litre of beef stock and half a bottle of red wine. Finally, add four heaped tablespoons of sweet paprika,  one or two tablespoons of hot paprika and a tablespoon of caraway seeds. Don’t skimp on the paprika, if you do, you’ll only be cheating yourself. And don’t buy your paprika in those crappy little 30g jars they sell in the supermarkets – if you do, you’ll probably need about four of them… (see https://dadattheweekend.wordpress.com/2012/10/14/spice-boy/ for the right way to buy spices, or go to https://www.buywholefoodsonline.co.uk/culinary-herbs-spices-seasonings)

Ok – put a lid on it, stick it all in the oven at about 160c and forget about it for a few hours…

In the meantime, take a bowl and add about 100g of flour, a beaten egg, a pinch of salt and enough water to make a very thick batter. Mix it well, cover it and throw it in the fridge until you’re about 20 mins from serving the meal.

After a few hours, and when your beef is extremely tender, you can start to pull it all together – the goulash should be quite soupy at this point (add more water if it isn’t). Season it to taste with salt and pepper. Take a pan of boiling salted water and if you have a csipetke or spaetzle machine, stick the dough batter through it into the boiling water. If you don’t (like me), position a large holed grater over the top of the pan, and using a spatula, dump a large blob of the batter on top of the grater and push it through to create little blobs of dough which will solidify as they hit the water. Repeat until you’ve used all of the batter. The csipetke will not be evenly shaped at all, but that’s ok. Let them boil in the water for about 20 mins, drain, add butter and chopped parsley and you’re ready to go.

Serve the goulash in bowls with chopped parsley, a huge dollop of soured cream and the csipetke. Make sure you have a bottle of heavy red wine to go with it…

Lasagne mark two (and it’s almost vegan)

IMG_4205

If you were to scour the recipes on this blog with a keen eye, searching for elements of other people’s work, you may well find the odd dish that has taken inspiration from a particularly good book or TV show (although I will never steal from Rick Stein – there’s something about the way in which he treats people around him that I don’t like). I can say however with great confidence that this one is unique. No one has ever cooked this dish before (please don’t google it, I don’t want my bubble burst). And it could very easily be vegan if you wanted it to be – you just have to leave out the butter, cream and parmesan. Although I didn’t.

Tomato, sweet potato and watercress lasagne

So here goes – start by making your tomato ragu. Fry a finely chopped onion along with 5 cloves of garlic and a small red chilli in a pan and once soft, add 4 finely chopped tomatoes, a load of tomato juice (or tomato puree) and a slug of red wine. Season well and then add the chopped stalks of a large bunch of basil. Once the sauce has reduced and has a rich flavour, take it off the heat and once it has cooled a little, add a handful of small yellow plum tomatoes chopped in half. Set aside.

Now make a bechamel with soy or almond milk (or cow’s milk if you prefer) by melting a huge lump of butter, incorporating plain white flour and adding the milk gradually over the heat constantly stirring until you have a silky smooth sauce. Add a 100ml of double cream, lots of grated nutmeg and season well. Set aside.

Take a large bunch of watercress (as with spinach you’ll need more than you think) and heat in a pan with butter. Once it starts heating through, add a couple of large spoons of cream cheese or ricotta. Set aside.

Now to assemble it all. Take a large oven dish, put half of the tomato ragu into the bottom and top it with a full handful of fresh basil leaves followed by a layer of lasagne sheets. Spread a thin layer of bechamel over the lasagne. Now thinly slice (a mandolin is good here) a raw sweet potato, skin and all, and places the slices over the bechamel. Spread another thin layer of the bechamel over the sweet potatoes and then spoon the watercress mixture over the top. Place another layer of lasagne sheets, followed by the remainder of the tomato ragu and finally the rest of the bechamel. Grate parmesan over the top and you’re done. You can now store the lasagne until you’re ready to eat.

To cook it, place in a preheated over at 180c for 40 mins and then get it out and let it rest for a few minutes before serving with a loaf of your very best sourdough


Sourdough

IMG_4021

Sunday morning, my first sourdough loaf is in the oven, it’s cold and crisp outside, William just came downstairs and gave me a hug, Immie and Oscar are fast asleep, Gardner’s world is on BBC2 and I’m about as happy as a 47 year old half Hungarian can be.

The sourdough starter has been alive for a week now and this loaf started its journey yesterday evening at about 6pm, so it better be good. But we before we tackle the bread situation, I’m going to start with a plug for my new best friend Nigel. Nigel owns a truffle business. He imports truffles from around the world and sells them online through his site http://www.trufflehunter.co.uk. We became acquainted on a course aimed at helping small businesses grow – the idea is that you meet other business owners and learn from each other, share experiences, grow your network etc etc. I met a bloke who sells truffles. Pretty much hit the jackpot I reckon. Not that it matters, but he’s a pretty good bloke too – it’s not all about the truffles you know (yes it is). Anyway, check out his site and buy something – I hear the minced summer truffle is very good – mine hasn’t arrived yet but I’ll report back when it does. And I will most definitely be using his black winter truffles for dinner at my sister’s on Christmas Eve (mates rates!). Oh yes I will.

Anyway, back to the bread…

Before you can start baking you need a sourdough starter, which takes about a week to get going. There are a bunch of ways you can do it – I used wholemeal flour, water, honey and yoghurt in mine, but I’m sure there are better ones out there, so I recommend googling it and picking one that suits you.

Making the bread don’t require any more effort than a normal loaf, but it does need time as the sourdough starter works more slowly than yeast, so you need to get going the day before you want to eat your bread.

Start by making a basic bread mix with your preferred flour (I used a strong white flour for this one), a little salt and plenty of olive oil, and then rather than pouring in water, use the starter instead (and then replenish the starter with fresh flour and water). Mix and knead the bread throughly until you have a lovely smooth and very elastic dough. Let it prove for a couple of hours in a bowl at room temperature covered in a damp cloth.

After a couple of hours, knock back the bread, shape it into a ball and put it in a banneton. I don’t have a banneton (yet) so I used a large bowl lined with a teatowel well dusted with flour. Cover it all and put it in the fridge overnight.

In the morning, heat your oven to 225c and place a tin in the oven filled with boiling water to ensure you get a nice steamy atmosphere in there which will give the bread a good crust. Once it’s reached temperature, tip out the bread onto a baking tray dusted with flour, slash the top of the bread with a sharp knife, dust it with more flour and stick it in the oven for about 45 mins. I turn the oven down to 200c after about 10 minutes. Check the bread from time to time to ensure it doesn’t burn.

Take it out, cool it, eat it.

Postscript – I’ve just broken into it and had a few chunks with a slab of butter. It’s so much lighter, crunchier, airier and tastier than bread baked with yeast. You have to try this.